Design Patterns: Asp.Net Core Web API, services, and repositories
Part 1: Introduction

In this article series, I’d like to go back a little (from my previous Microservices Aggregation article which was more advanced) and introduce some more basic design patterns. Those patterns help decouple the application flow and extract its responsibilities into separate classes.
The goal is to give each class a single unique responsibility, which will help us follow the Single responsibility principle. See the SOLID principles for more information.
The series (shared section)
In the series, we will create an Asp.Net Core 2.0 Web API, and we will focus on the following major concerns:
- The web part; the HTTP request and response handling.
- The business logic; the domain.
- The data access logic; reading and writing data.
During the article, I will try to include the thinking process behind the code.
Technology-wise, we will use Asp.Net Core, Azure Table Storage and ForEvolve Framework to build the Web API.
To use the ForEvolve Framework (or let’s say toolbox), you will need to install packages from a custom NuGet feed.
If you dont know How to use a custom NuGet feed in Visual Studio 2017, feel free to take a look at this article.
If you do, the ForEvolve NuGet feed URI is https://www.myget.org/F/forevolve/api/v3/index.json.
We will also use XUnit and Moq for both unit and integration testing.
Table of content
I will update the table of content as the series progress.
“Prerequisites”
In the series, I will cover multiple subjects, more or less in details, and I will assume that you have a little idea about what a Web API is, that you know C# and that you already have a development environment setup (i.e.: Visual Studio, Asp.Net Core, etc.).
The goal
At the end of this article series, you should be able to program an Asp.Net Core Web API in a structured and testable way using the explained techniques (design patterns). These design patterns offer a clean way to follow the Single Responsibility Principle.
Since design patterns are language-agnostic, you can use them in different applications and languages. In an Angular application, you will most likely use Dependency Injection for example.
This is one of the beauties of design patterns; they are tools to be used, not feared!
Asp.Net Core 2.0
At the time of the writing, Asp.Net Core 2.0 was still in prerelease, and I updated the code samples to use the release version.
You will need the .NET Core 2.0.0 SDK and Visual Studio 2017 update 3 or the IDE/code editor of your choosing.
The patterns
We will follow the same concept that are behind the N-tier architecture but, without creating multiple assemblies. In our case, we don’t need that level of separation and depending on how the code is organized; it is not mandatory.
If you don’t know anything about N-tier architecture, don’t worry I will explain what you need to know during the series.
More on that, with the way Asp.Net Core handles references by default, we would have access to our data access code from the presentation layer anyway which would void the idea behind layering.
That said, there are always multiple ways of having things done in software engineering, suffice to know enough and to choose wisely. So keep learning!
Instead of dividing a software into layers, we can split the software into small independent projects where each project (assembly) owns all of the code required for its sub-domain (or Bounded Context). This way we encapsulate the code in “domain bubbles” instead of layers. We could see this as cutting our software vertically instead of horizontally.
More on this another time, let’s go back to our business!
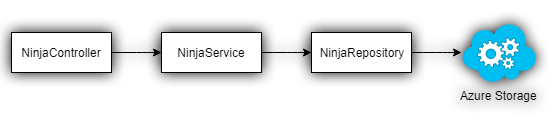
The basic idea is the following:
- A user sends an HTTP request to the server.
- Asp.Net MVC route the request to a
Controlleraction. - The action’s responsibility is to handle the request and the response, nothing more.
- Since the domain logic is not of the controller responsibility, it must be delegated to another object. That object is the
Service. - While the
Serviceowns the domain logic responsibility, it cannot take another one so it cannot handle the data access logic. It must delegate that to theRepository. - The
Repository, as already stated, is responsible for the data-access. Basically, it read/write data from/to a data-source.- In our case, the data-source will be an Azure Storage’s Table.
This may sound complicated, but don’t worry it is not, it is pretty simple once you get used to it. This is a modular (reusable) and testable (reliable) approach.

Controller to the data-source passing by the
Service and the Repository.
This is a good default way of doing things as long as there is no special cases or restrictions.
The Domain
Now that we settled on the parts we want to talk about, we need a subject for our Web API. The subject is the domain. Since coding is fun, let’s use “Ninjas” as our domain. Ninjas are always fun to talk about, so, why not, right?
To redraw the previous schema using Ninjas, we would need the following classes:
- The
NinjaControllerclass (presentation layer). - The
NinjaServiceclass (domain logic layer). - The
NinjaRepositoryclass (data access layer).
Controller to the data source, including some implementation details (hard coupling).Dependency injection
As you may have noticed, a class that calls a second class that calls a third class means coupling.
NinjaControllerandNinjaServiceare directly coupled.NinjaServiceandNinjaRepositoryare directly coupled.NinjaControllerandNinjaRepositoryare indirectly coupled.
In our final application, we will break that coupling using Interfaces and we will bind everything together with Dependency Injection.
Conceptually, we will add the two following interfaces:
- The
INinjaServiceinterface (domain logic abstraction). - The
INinjaRepositoryinterface (data access abstraction).
And we will implement them in these classes:
- The
NinjaServiceclass implementsINinjaService. - The
NinjaRepositoryclass implementsINinjaRepository.
The conceptual representation of the process, at this point, could look like this:
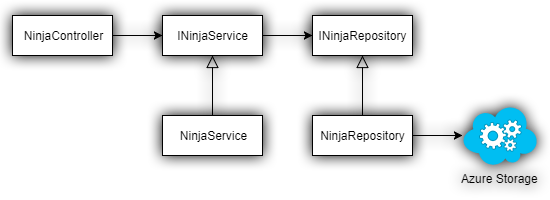
Controller to the data source. This is a conceptual break of the hard coupling of the previous schema.Since an interface is only an empty contract containing no code, a class that depends on an interface, only depends on its contract, not on any of its implementation. Applying this principle will allow us to decouple our classes.
From now on, our classes will only use other interfaces; never another concrete implementation. This could be represented as follow:
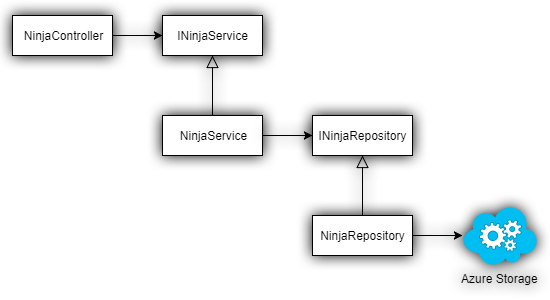
Controller to the data source, fully decoupled.As we can see in the previous schema, the NinjaController class only know about the INinjaService interface and know nothing else.
The same goes with the NinjaService class, its awareness of the system is limited to INinjaRepository interface.
Even better, the NinjaRepository class is the only one that knows about Azure Storage.
By using interfaces instead of concrete classes, we broke the direct dependencies between our implementations.
As stated before, we will use Dependency Injection to link all of these back together. We will cover the basics of Dependency Injection in the next article of the series.
Interesting fact
Dependency Injection is now built-in Asp.Net Core; which is a really good thing.
The benefits
Once you get used to these patterns, it adds flexibility at near zero cost.
The time to code a Service or a Repository is minimal, especially when using a tools like ForEvolve.Azure or a full-fledged ORM like Entity Framework.
Examples of what you could do
It gives you the opportunity to swap a data source with minimal to no impact on the domain logic. The swap can even be done at runtime.
Same thing goes for the Controller and the Service, helping you to keep your public API healthy.
For example, we could code two classes that implements INinjaRepository. We could then swap our data access logic from Azure Table Storage to MS SQL Server as easily as changing the dependency injection binding.
Both implementation could be use at the same time for different purpose in our program, sharing the Domain Logic while persisting the data in different places.
Concrete idea: a configurable data source for each user, at runtime.
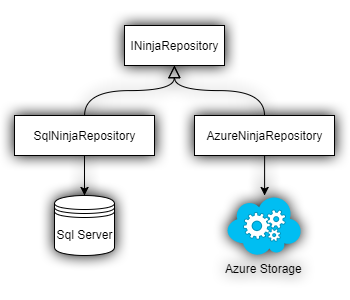
INinjaRepository allowing to easily swap data-sources without impacting the domain logic.Swappable implementations example
To simplify things up, I implemented a small example using simplified classes. If you are interested in this topic, I invite you to take a look at my little demo project, available at GitHub.
In that project, I use the patterns explained in this series, so you might want to consider going through the series first.
The end of this article
What have we covered in this article?
We now understand or have learned a few concepts that we will apply in the articles of the series and the reasons behind these architectural choices. In each subsequent articles, we will focus a little more on each of those parts individually.
Here are the design patterns we talked about:
- Controller (presentation layer) - MVC - Web API
- Service (domain logic)
- Repository (data access)
- Dependency Injection (binding everything together using Inversion of Control)
What’s next?
Next, we will start writing code and see all that theory in practice, beginning by the Controller and the API Contracts.
But before that, we will talk a little about Dependency Injection to help beginners understand a little more about this unavoidable subject.
If you are familiar with Dependency Injection in Asp.Net Core, feel free to skip that article.
Last word (shared section)
Table of content
Resources
Some additional resources used during the article (or not).
Articles & concepts
- Bounded Context
- Dependency Injection
- From STUPID to SOLID Code!
- Mocks Aren’t Stubs
- Testing and debugging ASP.NET Core
Tools & technologies
Code samples
Special thanks
I’d like to finish with special thanks to Emmanuel Genest who took the time to read my drafts and give me comments from a reader point of view.