You are now on page 2. Here you can read all my findings concerning autofocus and speed, as well as information about the movie capabilities, battery life and other features.
- Page 1: design, functionality and image quality
- Page 2: autofocus, speed, stabilisation, video, other features and conclusion
Table of Contents – Page 2
1. Autofocus system and settings
2. Single AF, Eye and Face detection
3. Continuous autofocus and tracking
4. Shutter, continuous shooting speed and buffer
5. Image stabilisation
6. Video
7. Flash
8. Other settings and extra features
9. Battery life
10. Lenses and respective systems
11. Price
12. Conclusion
13. Sample images
Autofocus system and settings
The Olympus OM-D E-M1 mark II and the Fujifilm X-T2 sport the most advanced autofocus system each brand has to offer today.
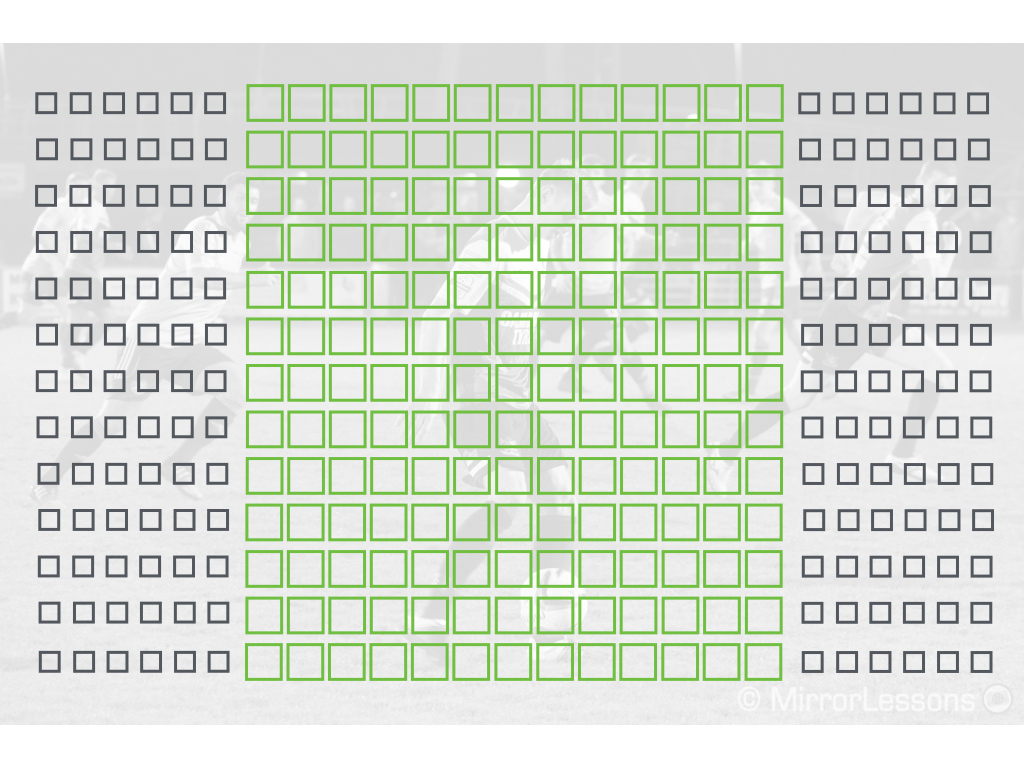
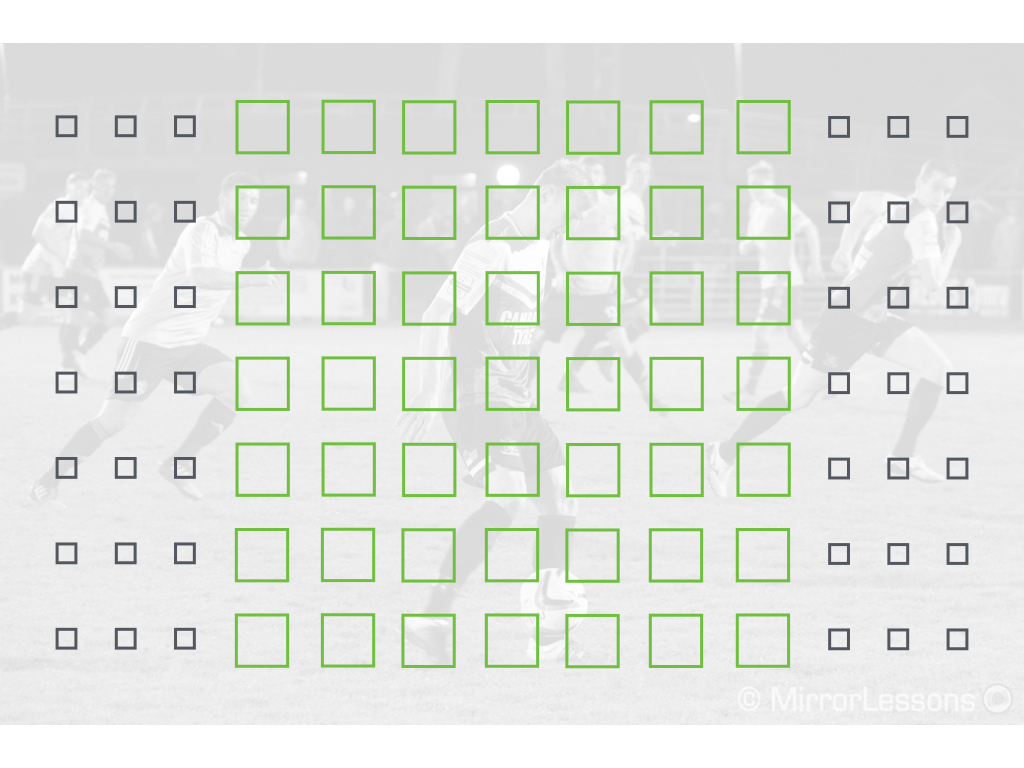
The E-M1 II has 121 hybrid points (contrast and phase detection). The phase areas are all cross-type, meaning that each point can detect on a horizontal and vertical level. Thanks to phase detection, the camera is compatible with 4/3s or even third-party DSLR lenses mounted via a compatible adapter.
The X-T2 has 91 points: 49 of them are phase detection areas (7×13 grid). You can also choose a 325 point (13×25) grid: the areas are subdivided to allow you to focus more accurately. However the 13×25 grid is only available in Single area mode.

Each cameras has various settings to control the autofocus behaviour. Listing all of them would be too time consuming so instead I am going to highlight the ones I prefer for each system and tell you which settings are more advantageous on one camera compared the other.
If we start with the autofocus areas, we find what I consider our first point in favour of the X-T2. First, the single point can be varied in size (6 steps) which is an advantage when you want your focus area to be as precise as possible (macro photography for example). On the E-M1 II, the single point has two sizes: normal and small.
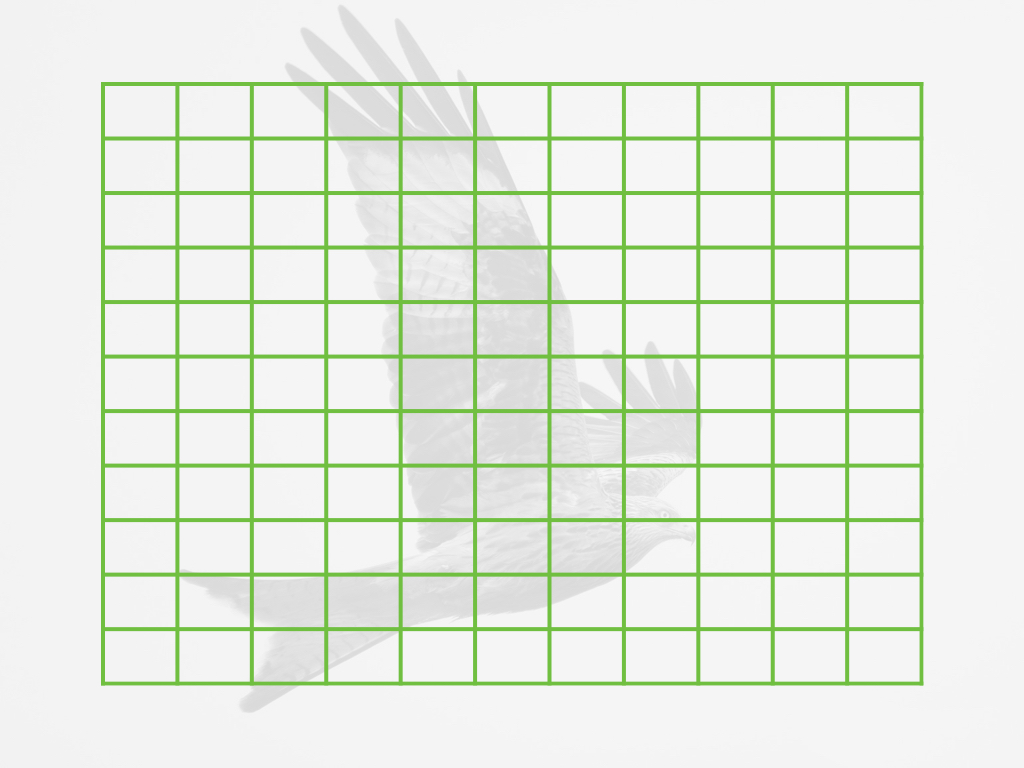
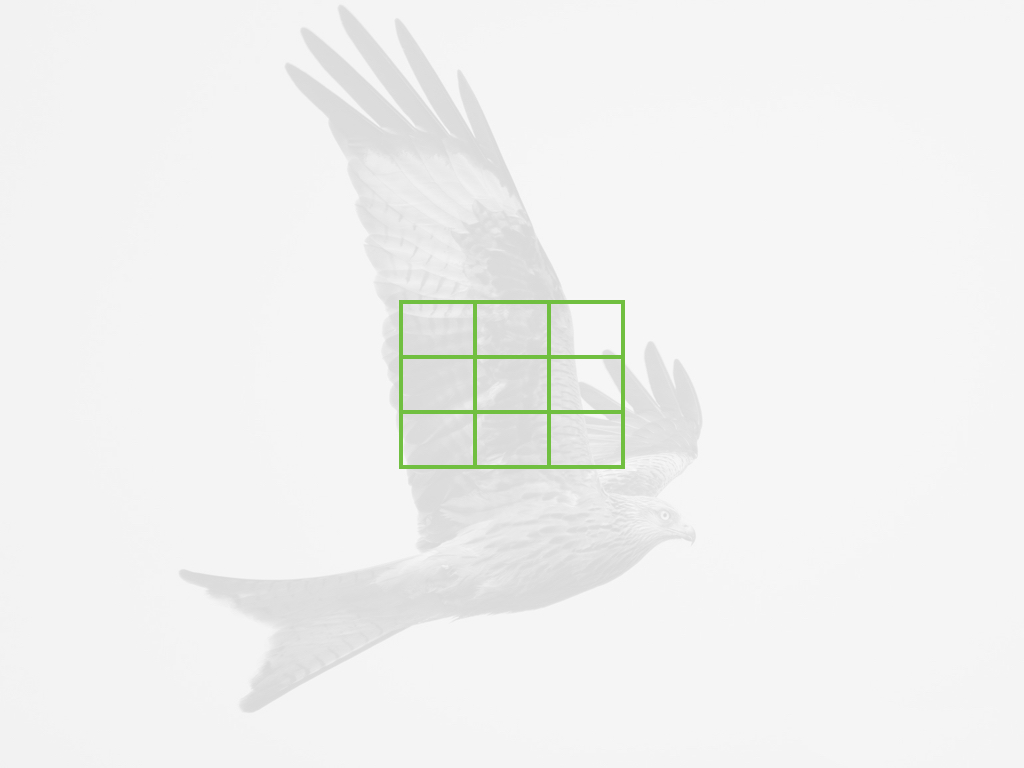
Then we have different groups of AF points: on the X-T2, I can choose between three grids (3×3, 5×5, 7×7) when using the Zone AF mode.
This is by far my favourite mode when dealing with moving subjects, whether they be slow or fast / close or far away. Not only is Zone AF very accurate and reliable but it also gives you more leeway to reduce or enlarge the AF area depending on your needs. For birds in flight, for example, I use a larger area (5×5 or 7×7) while for a runner, the 3×3 grid is sufficient.


On the E-M1 II, you have 5-Group or 9-Group Target options.
More than once, I found these areas too small when I had difficulty keeping my subject exactly at the centre of the frame. The only option is to switch to the All-Target mode where the full 121 focus points are used. (On the X-T2, the same thing is available with the Wide/Tracking mode.) However using the entire zone on the sensor is not always the optimal choice: reducing the area can help the camera concentrate on one specific zone and avoid mis-focusing.
So long story short, the E-M1 II lacks a middle ground option between the 9-Group and All-Group, unlike the Fuji camera.

Both cameras share a similar set of options such as focus or release priority, AF-Lock and back-button focusing, and Eye and Face detection (more on this later).
The X-T2 allows you to manually check your focus point after autofocusing (AF+MF) while keeping the shutter release button half-pressed. On the E-M1 II, you can use AF in magnification mode, which can be an interesting alternative to fine-tune your focus point in macro mode given the absence of smaller single points.
An interesting option for the X-T2 is that you can choose to use different focus points or focus modes depending on the orientation of the camera. For example I can set a single AF point on the left area of the screen when working in horizontal mode. Then when I change to the vertical/portrait orientation, I can have the camera to automatically change the AF to a 3×3 zone grid at the centre.
There are important settings to control the autofocus sensitivity in continuous mode and I will described how effective they are in the dedicated chapter.
The last point I want to raise concerns a handful of useful settings that are exclusive to the E-M1 II.
First there is the Home position: you can configure a function button to the AF point bring back to the centre or any position in the frame you previously choose in the menu. This allows you to quickly jump between two different AF point positions with a simple click and can be very helpful in specific shooting situations such as portraits, for example. Alternatively you can use it to switch between two different groups of points and you can add the option to switch between two AF modes as well. A good example can be switching from S-AF and single point to C-AF and 9-Group Target with a single click.
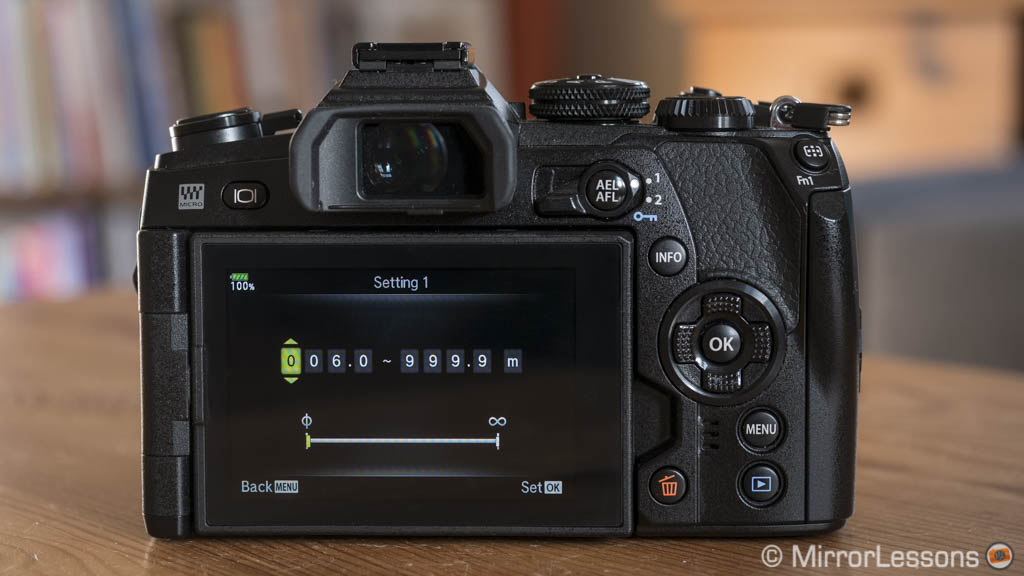
Another interesting option on the Olympus camera is AF Limiter, which behaves like the traditional switch button you find on telephoto lenses but in this case you can limit the autofocus with any distance range you want.
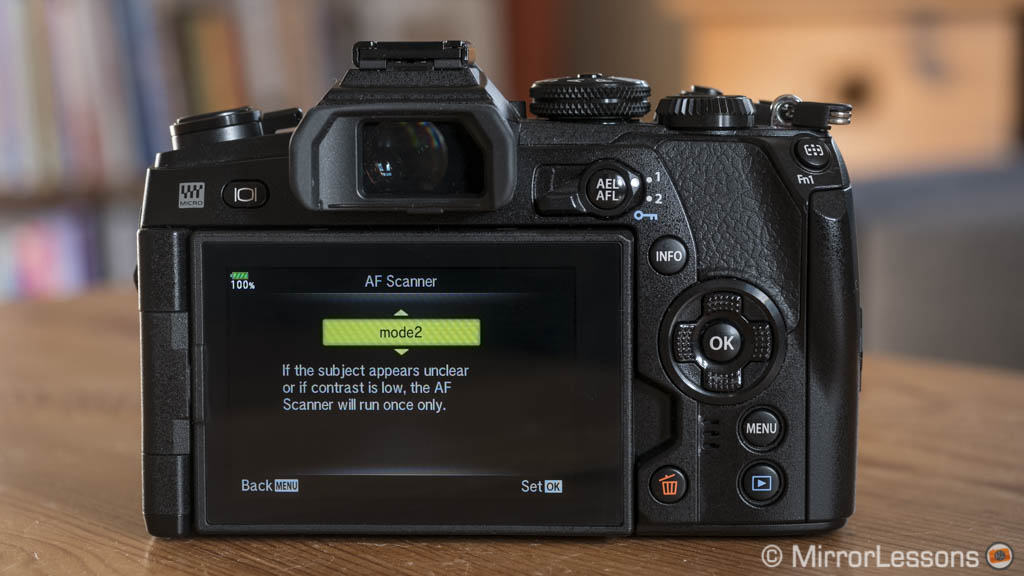
Finally AF Scanner on the E-M1 II allows you to control the AF behaviour when the camera can’t detect the subject either because the scene is too dark or because the contrast is too low.
Single AF, Eye and Face detection
Now that we’ve seen the various settings, let’s see how the two cameras perform.
In single autofocus, they both focus really fast and accurately in good light conditions. There is, however, a caveat concerning the X-T2: you get better performance with recent prime lenses like the affordable f/2 WR series or the 90mm f/2. With older lenses such as the XF 35mm f/1.4, the AF is slower but remains decent.
While certain Micro Four Thirds lenses have a slower motor than more recent ones (for example, the Pana-Leica 25mm 1.4 vs the 25mm 1.2 Pro), the E-M1 II will give you more consistent results overall with the majority of native autofocus lenses.


In low light, the E-M1 II should have more sensitivity according to the official specifications: -6Ev with a f1.2 lens vs -3EV (the aperture is not specified on the Fuji but it is probably f2).
The E-M1 II can suffer a little more when there are specular highlights in the background (lights in a city for example) as they can prompt the camera to mis-focus. The X-T2, on the other hand, can have some trouble in strong backlit situations. Either way, moving the focus point slightly fixes the problem.


The Face and Eye detection modes can be excellent to capture family/group portraits. For serious portrait work, I would still rely on a single focus point, but the two cameras have definitely come a long way in this department.
For example, the Eye/Face AF proved pretty reliable with the E-M1 II at an Italian Comic-con event. We had a consistently good hit rate with both the 25mm Pro 1.2 and Leica 25mm 1.4 (new and old lens).

On the X-T2, the mode proved reliable with older lenses like the XF 35mm f/1.4 and for events with sufficient light. The recent firmware update 2.0 allows the camera to use face detection with phase detection areas which improves the speed and accuracy.

Neither system is perfect however: the E-M1 II can mis-focus with fast or unpredictable moving subjects like children running. I advise you to activate face and eye detection together and not just face detection as the latter can be more inconsistent.
Eye detection on the X-T2 can sometimes confuse the eye with other parts of the person’s face.
Continuous autofocus and tracking
Important note: both cameras have received software improvements via firmware update. The 3.0 version for the E-M1 II has added a significant boost in performance (read our dedicated post here).
Analysing the continuous autofocus performance of two different cameras is never a simple task. We performed simple side-by-side tests to check if there was a relevant difference but it is also important to analyse how the two products perform on their own with their respective lenses. Spending time and gathering experience with the products individually is also essential if you want to develop a complete idea of how they respond in various situations.
As of today, these are two excellent cameras you can find on the mirrorless market when it comes to continuous autofocus performance. So let’s see if one really does prevail over the other.
In our first basic side-by-side test, we can see that the X-T2 performs slightly better than the E-M1 II but neither gives a perfect result.
Thumbnail key:
- Normal thumbnail: subject is perfectly sharp
- Red thumbnail: subject is out of focus
- Yellow thumbnail: subject is slightly out of focus but details are still easy to detect

12-100mm Pro

XF 18-135mm
However these results do show a small inconsistency: in my E-M1 vs E-M1 II complete comparison, I got a better keeper rate by performing a similar test with a different lens, even though the AF settings were the same. Now I don’t believe that the 75mm’s AF motor is necessarily superior to the 12-100mm Pro’s but perhaps the faster aperture might have helped the camera in this case.

75mm f1.8 (test performed on another occasion)
Likewise, during yet another similar test carried out at a different time with the X-T2, I got a near-perfect hit rate with another lens. (In this case, it was the XF 90mm f/2.) Since it is one of the fastest AF lenses Fujifilm has ever designed, I am not surprised.

XF 90mm f2 (test performed on another occasion)
Looking at these first results, it is worth highlighting that a simple test like this is not always enough to show the complete capabilities of camera. Variables can introduce marginally different results.
Now, you may be wondering why I don’t always select the best and fastest lenses available for each system to perform these tests, and the answer is that, yes, it would be ideal but I can only use what I can get my hands on at the time. (Sadly, I don’t have access to an unlimited choice and supply!) But this is also the reason my conclusion doesn’t end here. So let’s continue!
I had the chance to use the two cameras for birds in flights, not on the same day but in the same location – my favourite red kite feeding ground. Now I can talk about some important settings that can influence the results.
The most important setting on the E-M1 II is called C-AF Lock.
You can choose from -2 (Low) to +2 (High). A negative value will encourage the AF to change less rapidly while a positive value will make the camera more reactive. I found that +2 gives better results for birds in flight, especially red kites which tend to vary their distance and speed more rapidly than other subjects. I tested each camera on three different occasions and my overall hit rate was around 50% if I count just the perfectly sharp shots, or 70% if I accept slightly less accurate results. Note that this score has improved with firmware 3.0.

With the X-T2, my first two sessions with red kites were rather disappointing, with my keeper rate being below 50%. It was only by finding the optimal combination in the AF-C Custom settings that the hit rate increased to around 75%, and by that I mean just the perfectly sharp shots.
The AF-C Custom settings on the X-T2 are more advanced than what you can find on the E-M1 II. You have three different entries to control three different behaviours: Tracking Sensitivity, Speed Tracking Sensitivity and Zone Area switching. You can choose among 5 presets while the sixth can be customised. It’s with the latter and the following values that I found the perfect match for BIF:
- Tracking sensitivity: 0
- Speed tracking sensitivity: 1
- Zone area switching: front
In short, the X-T2 continuous AF performance can be more difficult to configure at first but once you find the right settings for a specific subject, it gives you better results.

One focus mode that can help for birds in flight on the E-M1 II is AF-C + Tracking (aka 3D Tracking): as long as you have a clean neutral background that contrasts with the bird – such as a nice blue sky – the keeper rate is high and pretty consistent.
I find this mode more useful and versatile than the Wide/Tracking mode on the X-T2. With the latter, you can’t use the entire frame area when shooting in High continuous mode and the results are no different from using the largest Zone AF (7×7).

I had the chance to use the cameras at two different football games. The E-M1 II gave me an overall keeper rate of 70% (or 85% if I include the slightly soft results) and performed well with the Lumix 35-100mm f/2.8 as well. Here C-AF Lock at +1 or 0 can give you more consistent results because of the various dynamics of the game.

With the AF-C Custom settings on Set 1 or Set 5, the X-T2 gave me an 80% keeper rate (or 95% if I include slightly imprecise results).

I can also briefly mention two other sports for which I can’t offer a direct comparison: mountain biking and rally racing.
With the E-M1 II, I spent a day at Revolution Park with talented sports photographer Dan Wyre who gave me some precious tips for photographing the fast bikers coming down the hill. The Olympus gave me good results in the open air with a hit rate of 60% (90% counting the slightly soft results). In the woods with less light, the keeper rate was around 50% (or 70%).

With the X-T2, I had the chance to photograph a practice of Welsh driver Osian Pryce at the Phil Price Rally School before the Wales Rally GB world championship race.
Here a mix of Set 2 and Set 3 within the AF-C Custom settings gave me an average 60% hit rate (80% if I pixel peep less severely).
I admit that I was expecting more from the X-T2 here and it’s a shame I didn’t have the E-M1 II with me to compare. My guess is that using the presets (Set 3 is meant for accelerating / decelerating subjects like cars) rather than configuring my own Set in the AF-C Custom settings slightly reduced the keeper rate. Again this camera’s autofocus can be excellent but the settings really need to be spot on to get the best results.

Finally, when it comes to low-light performance and continuous AF, the X-T2 reveals itself to be the better performer. I couldn’t test the two cameras on the same evening but the event was similar: a lantern parade. The one with the E-M1 II was done in better light conditions since the sun had just set and the sky wasn’t dark yet. Despite the event with the X-T2 being darker, I got more consistent results with the Fuji camera.


Shutter, continuous shooting speed and buffer
The E-M1 II and X-T2 both have a maximum mechanical shutter speed of 1/8000s. With the electronic shutter, it extends two stops faster to 1/32000s. They both have a silent mode but the E-M1 II also benefits from a first electronic curtain option when the Anti-Shock mode is set to 0s.
A small negative point about the E-M1 II: the shutter release button is much more sensitive than the one on the X-T2.
In terms of continuous shooting speeds, the E-M1 II has an impressive advantage in comparison to the X-T2.
While the Fuji camera gives you everything you need in most situations, the Olympus has faster speeds as well as a special mode that can raise your chances of capturing the perfect moment for very fast action.
Both cameras have an High and Low mode that affects the live view. Let’s see where these differences lie.
High setting:
- E-M1 II: 15fps with mechanical shutter (AF locked on first frame)
- E-M1 II: 60fps with electronic shutter (AF locked on first frame)
- X-T2: 8fps with mechanical shutter and continuous AF (11fps with optional battery grip)
- X-T2: 14fps with electronic shutter and continuous AF
Low setting:
- E-M1 II: 10fps with mechanical shutter and continuous AF
- E-M1 II: 18fps with electronic shutter and continuous AF
- X-T2: 5fps with mechanical / electronic shutter and continuous AF
The Low mode gives you live view with blackouts on both cameras which allows you to track the subject more easily than if you were just seeing the last picture taken. Of course the Olympus has the advantage of shooting twice as fast which results in shorter blackouts. On the E-M1 II the two modes also differentiate the autofocus behaviour (AF Locked on first frame vs continuous AF).
The X-T2 can go as fast as 11fps with continuous AF and the mechanical shutter versus the 10fps of the E-M1 II. The latter, however, doesn’t require a battery grip to reach the fastest speed so alternatively we could see this as 8fps vs 10fps (or 8fps vs 15fps if we don’t consider C-AF).
As for the electronic shutter, although the X-T2 defends itself well in continuous AF (14fps vs 18fps), the E-M1 II wins with its maximum 60fps speed in High mode.
Additionally, the E-M1 II takes advantage of these impressive speeds by offering a mode called Pro Capture. By half-pressing the shutter release button, the camera starts to pre-load pictures into the buffer memory. Once you fully depress the shutter button, it can save up to 35 of those pre-loaded images to the SD card.
Note: Pro Capture works with Olympus Micro Four Thirds lenses only in L mode (with C-AF), and with all micro four thirds and four thirds lenses in H mode (focus locked on the first frame).

You might worry about rolling shutter affecting your images when the electronic shutter is activated. The good news is that both companies have made relevant improvements to sensor readout. However, the E-M1 II does a better job of minimising rolling shutter in most situations.
Note: you can find out more about electronic shutters in our dedicated article here.

Electronic shutter: vertical lines remain almost perfectly straight while panning at moderate speed.

An example of more distorted vertical lines with the electronic shutter while panning at a moderate speed.
Finally, a look at the buffer capabilities reveal that the E-M1 II is superior with both USH-II and UHS-I cards – the camera can shoot for longer and at faster speeds than the X-T2.
One advantage I found on the Fuji camera is a faster writing capability to the memory card in comparison to the E-M1 II.
Note: unfortunately I couldn’t test the 11fps capabilities of the X-T2 because I didn’t have the battery grip. RAW was set to lossless compressed on the Fuji camera.

Below you can find the results with the electronic shutter.
E-M1 II, electronic shutter:
- 60fps with RAW, UHS-II card: 600 frames taken in 60s, so the speed slows down to 10fps
- 60fps with RAW, UHS-I card: 136 shots taken in 60s so it slows down to approx. 2.3fps
- 18fps with RAW, UHS-II card: 562 shots taken in 60s, it slows down to approx. 9fps after 8s
- 18fps with RAW, UHS-I card: 139 shots taken in 60s, it slows down after to approx. 2.3fps after 5s.
- 60fps with JPG, UHS-II card: 635 shots in 60s, the speed slows down to approx. 10.5fps
- 60fps with JPG, UHS-I card: 220 shots in 60s, the speed slows down to approx. 3.6fps
- 18fps with JPG, UHS-II card: 594 shots in 60s, it slows down to approx. 10fps after 10s
- 18fps with JPG, UHS-I card: 219 shots in 60s, it slows down to approx. 3.6fps after 8s
X-T2, electronic shutter:
- 14fps with RAW, UHS-II card: 294 frames taken in 60s so the speed slows down to 4.9fps
- 14fps with RAW, UHS-I card: 75 frames taken in 60s so the speed slows down to 1.2fps
- 14fps with JPG, UHS-II card: 499 frames taken in 60s so the speed slows down to 8fps
- 14fps with JPG, UHS-I: 193 frames taken in 60s so the speed slows down to 3fps
Image stabilisation
In this chapter, it is very easy to declare the superiority of the E-M1 II. Not only does the Olympus camera have the most advanced 5-axis sensor shift out there (5.5Ev of compensation) but it can combine sensor and the optical stabilisation of select lenses (Sync IS) to push the performance to even greater extremes (6.5Ev with the 12-100mm Pro).
The X-T2 lacks sensor stabilisation so it relies on the optical stabilisation of its lenses.
Now if I check the official CIPA standard measurement for the Fuji XF 18-135mm, for example, we can see that the lens offers 5 stops of compensation, which isn’t too far behind what 5-axis shift can do. So where do the differences really lie?
Well, the best way to find out is to analyse how far you can push the two cameras for slow exposures taken hand-held.
The E-M1 II gave me sharp results down to 4 seconds at 12mm with the 12-40mm Pro (using sensor stabilisation only) or 8 seconds with the 12-100mm Pro (Sync IS). (You can check out our 12-40mm vs 12-100 comparison here.)
With the X-T2 and 18-135mm lens, the best result I got at 18mm was 1 second.


With longer focal lengths, the E-M1 II gave me a good result of 1.6s with the small 75mm prime (sensor only) and 2 seconds at 100mm with the 12-100mm Pro (Sync IS).
With the X-T2, not even half a second gave me a perfect result at 95mm.


So despite the excellent optical stabilisation of the XF 18-135mm, sensor shift and Sync IS are clearly superior and CIPA standards don’t give you reliable insight into the differences in this case. Furthermore, having on-board image stabilisation allows Olympus users to use IS with any lens, including adapted ones.
Out in the real world, the E-M1 II coupled with the 12-100mm allowed me to bring back many perfectly sharp shots between 5s and 10s (the best I ever achieved was 20s but it happened only once).

With the X-T2 and OIS lenses, depending on how good the optical stabilisation is, you can expect to use between half a second to 1/10s to maintain a decent keeper rate. Only eight XF lenses have OIS. For all other lenses, you can use the good old rule of thumb.

Video
The E-M1 II and the X-T2 are the first 4K capable cameras from Olympus and Fujifilm. They can record Ultra HD video at 24, 25 or 30fps at a bitrate of 100mbps. The E-M1 II can also record in Cinema 4K format at 24fps at higher bitrate of 232mbps but the latter is variable.
Below you can watch a side-by-side comparison between the two cameras followed by a quick analysis of the various features.
Concerning colours, the same comments found in the JPG chapter can be applied here. I can add that for video, the X-T2 can render stunning colours as long as you control the white balance precisely, or rely on Auto WB for static shots and light. Profiles like Astia or Classic Chrome can really shine, giving you a unique colour palette. The E-M1 II, on the other hand, renders well-balanced colours although the look is somewhat less visually impressive. Of course this is also a matter of personal preference.
The E-M1 II now has a Log gamma profile (OM-Log400) thanks to firmware 3.0. The Flat Mode gives good results but feels more like a normal picture profile that has been enhanced for video, which is better than nothing of course. If you play with some settings such as highlights and shadows, the dynamic range of the Olympus camera is at the same level as the X-T2 in terms of highlight preservation. There is more detail in the shadows but also more noise in comparison to the X-T2. The Fuji camera has an F-Log profile available via the HDMI output or internal recording (firmware 4.10).
One area in which the X-T2 used to be clearly superior (far more than for stills) is continuous autofocus: the E-M1 II simply couldn’t keep up with fast moving subjects because it wasn’t making use of its phase detection points for video, unlike the X-T2. Firmware 3.0 has changed the odds and the Olympus is now much faster.
Concerning high ISO performance, the X-T2 produces cleaner images with less noise from 3200 onwards. The Fuji camera also has an extra step of sensitivity (12800 ISO) while the E-M1 II stops at 6400 ISO. Noise reduction won’t work on the Fuji camera but is available on the OM-D.
Both cameras can deliver sharp footage, although I found the E-M1 II to be a little better overall. (The difference you see in the video is also influenced by the lenses.) They both perform full pixel readout so aliasing and moiré are not an issue in 4K. The X-T2 crops the sensor (1.17x) while the Olympus camera doesn’t perform any crop.
Concerning rolling shutter, neither camera is badly affected but the E-M1 II does a marginally better job of controlling it.
In Full HD, both cameras can record at a maximum frame rate of 60fps but the X-T2 also has an HFR mode that can record at 120fps for slow motion use (firmware 4.10). The E-M1 II has more compression options with All-intra at 202mbps (30fps max) or Super Fine IBP at 52mbps. The X-T2 records IPB at an average of 58mbps.
In terms of image stabilisation, the Olympus camera once again has a clear advantage. Not only do static shots look as if they were taken on a tripod but the 5-axis sensor shift makes complex movements look pretty stable.
The E-M1 II has a few extra features available such as Movie Effects, Movie clips and Teleconverter (2x).
Concerning the interface, the E-M1 II has a headphone jack and both feature a 3.5mm mic input.
Below you can watch two extra videos made with these cameras.

Flash
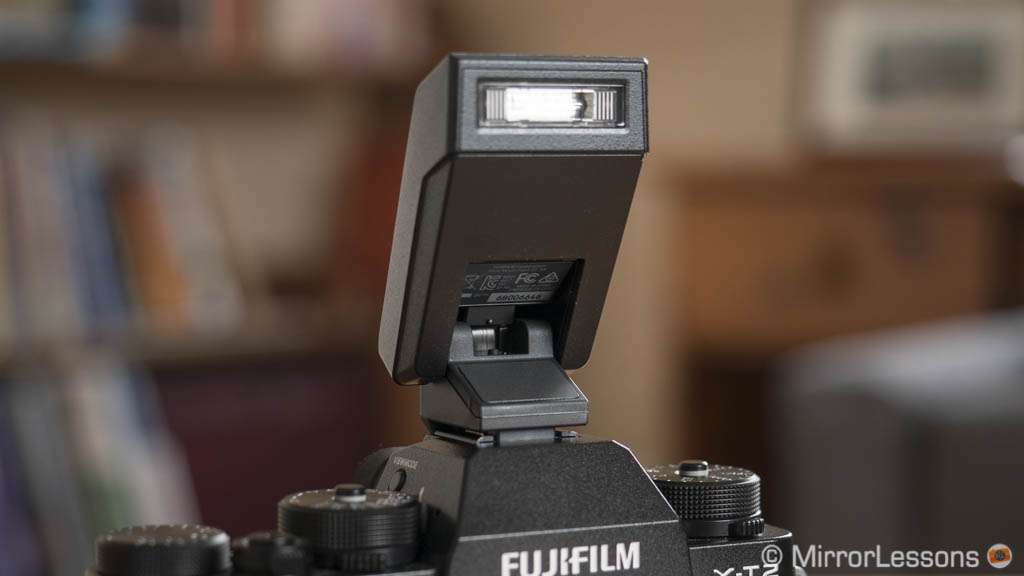
The E-M1 II doesn’t have a built-in flash but the small FL-LM3 is provided. The same goes for the X-T2 but its EF-X8 unit doesn’t have a multi-angle head. It does have a slightly more powerful guide number (36 vs 30) however.
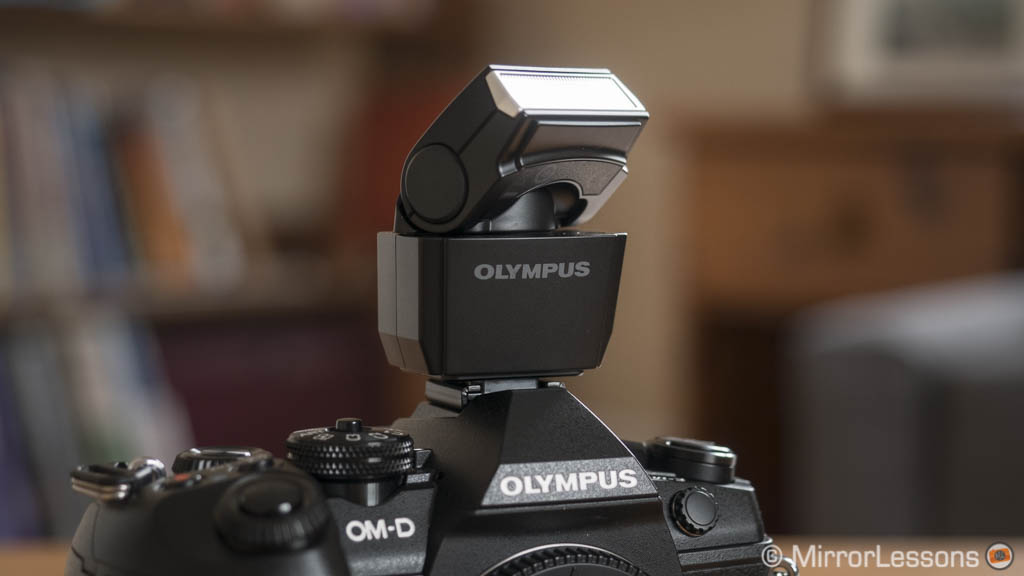
Both cameras have a maximum flash sync speed of 1/250s and feature a flash sync socket on the front of the body.
The E-M1 II can work in Auto, manual and TTL modes with Red-eye reduction and slow sync options. It features the FP mode (Auto or Manual) to bypass the limit of the mechanical sync speed and shoot up to 1/8000s (with compatible flash units). Flash compensation goes up to ±3Ev.
The camera relies on the RC mode (Olympus optical wireless flash system) to use multiple flash units. There are currently two flash units specifically designed for the mirrorless system – the FL-900R and FL-600R. You can also rely on older flash models made for the 4/3 DSLR system, Panasonic flashes, as well as third party options like Nissin that retain full compatibility with the camera. The recent firmware update 1.2 makes the camera compatible with the Profoto Air Remote TTL-O which allows TTL and HSS with compatible off-camera flash like the B1 or B2 series.
With the included flash, the X-T2 can work in TTL, Commander and Manual modes with slow TTL, Front or Rear Sync curtain capabilities. Flash compensation is ±2Ev and you can choose between 3 Red-Eye removal options. There is a TTL-Lock mode where you can lock TTL metering based on the last picture taken.
For wireless control, the X-T2 can benefit from the new flagship EF-X500 flash uni that supports optical wireless shooting and HSS. It is the only flash for the system currently capable of matching the same features found on most Micro Four Thirds flashes. You can find compatible products from third-party manufacturers but some features like HSS or wireless might not be available or may require a firmware update. Firmware 3.0 adds TTL and HSS compatibility with the Profoto Air Remote.
Other settings and extra features
The two cameras share some extra features but the E-M1 II definitely has a few aces up its sleeve.
Among the similar features available on both products, we find:
- Intervalometer: up to 999 shots for both cameras but with the E-M1 II you have the option of saving the result as a 4K video (although at a slow 5fps).
- Multiple exposure: 2 frames for both
- Advanced filters: many filter effects including Toy Camera, partial colour etc. On the E-M1 II they are called Art Filters and offer additional settings.
- RAW processing: convert a RAW file into a JPG file by changing exposure, white balance, colour profile and many other settings. With the X-T2, you can do the same with your desktop computer via the Fujifilm X RAW Studio software that allows you to process RAW files by using the camera’s image processor.
- Wifi: remote control the cameras and transfer images to your mobile device.
- Tethering: via Olympus Capture for the E-M1 II and a Lightroom plugin for the X-T2 (firmware update required)
- Copyright information: for the exif data
- Voice Memo: you can record a quick audio memo in playback mode
- Camera settings backup: you can save, restore or transfer your camera settings via a desktop software on your computer (Digital Camera Updater for the E-M1, Fujifilm X Acquire for the X-T2).
Both cameras have Bracketing capabilities. The E-M1 II offers AE, HDR, WB, Flash, ISO, ART and Focus Bracketing (with Stacking option). Exposure bracketing allows you to shoot up to 7 shots at ±2Ev. With focus Bracketing, you can take up to 999 shots and set the focus differential between each frame. Focus Stacking automatically merges 8 images and produce a JPG file.
Note: Focus Stacking only works with select Olympus Micro Four Thirds lenses (8mm Fisheye Pro, 60mm Macro, 30mm Macro, 12-40mm Pro, 40-140mm Pro, 7-14mm Pro, 300mm Pro and 12-100mm Pro).

The X-T2 has bracketing options including AE, ISO, Film Simulation, White Balance and Dynamic Range bracketing. Exposure bracketing can go up to ±3 Ev and 9 frames. Firmware 4.10 added a Focus Bracketing option as well.
There is one function not found on the Olympus camera and that is the Panorama mode: on the X-T2 it saves a JPG file and you can choose between two angles and four directions.

Finally, here are the features exclusive to OM-D E-M1 II:
- Live Time and Live Bulb: preview a long exposure in real time on the screen
- Live Composite: useful for light painting, fireworks and star trails
- Keystone compensation: you can correct or accentuate the perspective of buildings shot from below
- Fisheye Compensation: it corrects distortion when using the 8mm f1.8 Fisheye
- Flicker Scan: it displays the amount of flickering in the EVF or LCD screen, allowing you to select a better shutter speed to minimise the undesired effect when working with the electronic shutter under certain artificial light sources like LED
- Lens Info Settings: you can create up to 10 profiles for adapted lenses that lack electronic contacts.
- High Res Shot
The last option allows you to create a 50MP (JPG) or 80MP (RAW) image by moving the sensor by half a pixel 8 times in rapid succession and merging the 8 images together. The function has some limitations: you need to use it on a tripod and it won’t work with fast moving elements. The amount of detail you capture, however, is impressive.

Click to open the 80MP version.

Finally, we have the manual focus assist options.
On the E-M1 II, you have magnification and peaking. With the latter you can choose between 4 colours, and vary the highlight intensity and image brightness to make peaking more visible.
On the Olympus camera you will also find the Preset MF mode where you can choose a specific distance that the camera focuses to when you switch to manual focus mode (useful for astro-photography for example).
The X-T2 has magnification, peaking (3 colours with two levels each) and Digital Split Image (colour or monochrome). With the last option, the central area of the live view is divided into four bars. You need to align the bars in order to achieve the correct focus.
Finally, a nice feature of the X-T2 available in the viewfinder is Dual View: it shows a magnified portion of the frame (where the focus point is) next to the image when focusing manually.
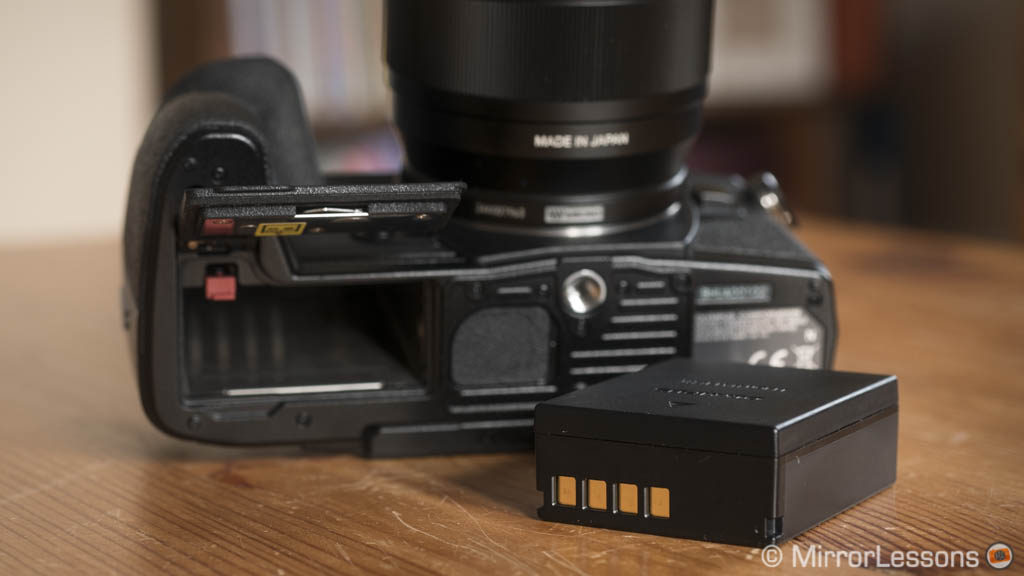
Battery life
Olympus designed a new larger battery for its flagship E-M1 II to fix one of the limitations we commonly associated with mirrorless cameras: a short battery life. The company succeeded and the camera is the first mirrorless that can give you similar results to a DSLR in this regard.
I often used a single charge for more than a day when shooting in normal conditions without stressing the camera too much. And even when taking advantage of the fast continuous shooting speeds or when recording 4K, it lasts a long time. I was able to come back with more than 1500 shots and still have 30% of the battery left. Recording 4K without image stabilisation for 30 minutes drained approximately 20% of the battery.
On the E-M1 II you will also find a Quick Sleep mode and a battery status page with various information about the battery you are using including the serial number, charge left, shot count and degradation (health). This information is stored in the battery itself so when you transfer it to a second body, it will display the same data.
The X-T2 is compatible with the same battery found on the X-T1 and other Fuji cameras. The brand released a new version that lasts a little longer but the performance doesn’t match that of the E-M1 II.
With a single charge, I can take as many as 800 shots. If I shoot a mix of stills and 4K video, it will drain faster and won’t make it through the day without a spare battery or two. For example recording 20 minutes of 4K drained the battery by 35%.
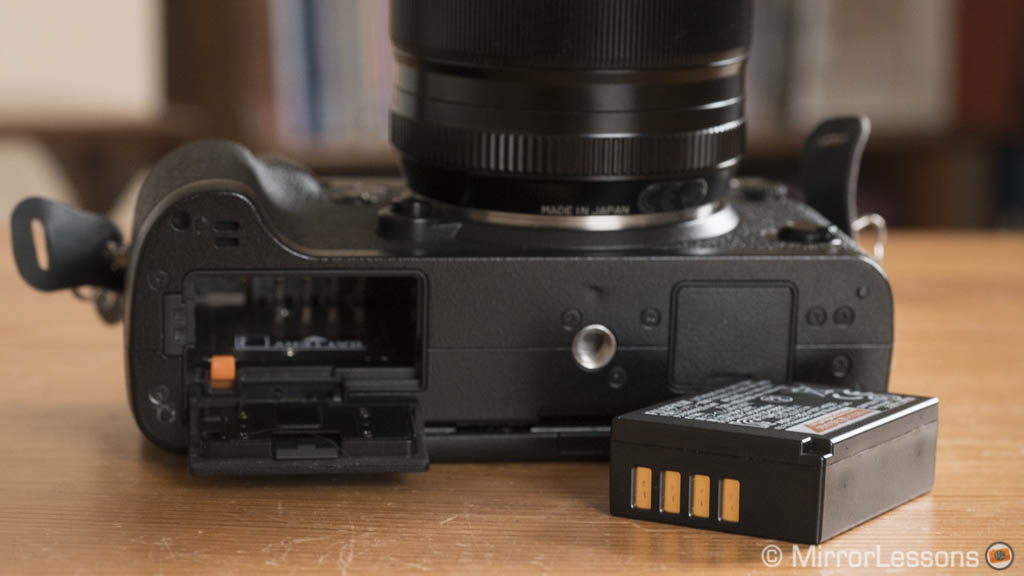
Both cameras have a battery grip option that can house two batteries each. The one of the the X-T2 also increases the continuous shooting speed with the mechanical shutter to 11fps.
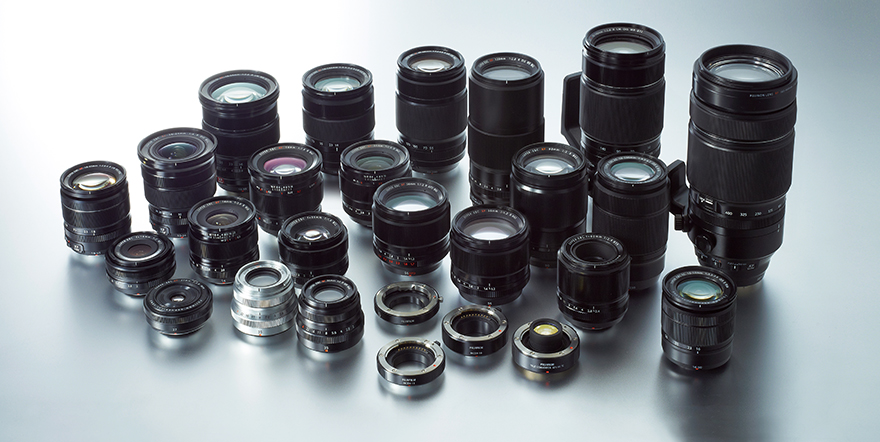
Lenses and respective systems
No comparison between two cameras from two different systems is complete without mentioning their respective lens ecosystems.
Here the E-M1 II has an advantage for the simple reason that the Micro Four Thirds system as been around for longer (more than 8 years since the launch of the Panasonic G1). You can use any Olympus and Panasonic Micro Four Thirds lens with full control and automation (except for a few special modes such as Focus Stacking or Sync IS which are limited to a restricted M.Zuiko selection).
This means that there are more than 50 lenses to choose from, excluding additional lenses you can find from Sigma and Tamron. There is a solution for every budget and need: advanced professional zooms, very fast lenses, affordable primes, various all-purpose zooms, fisheyes, extreme wide-angles and telephotos.
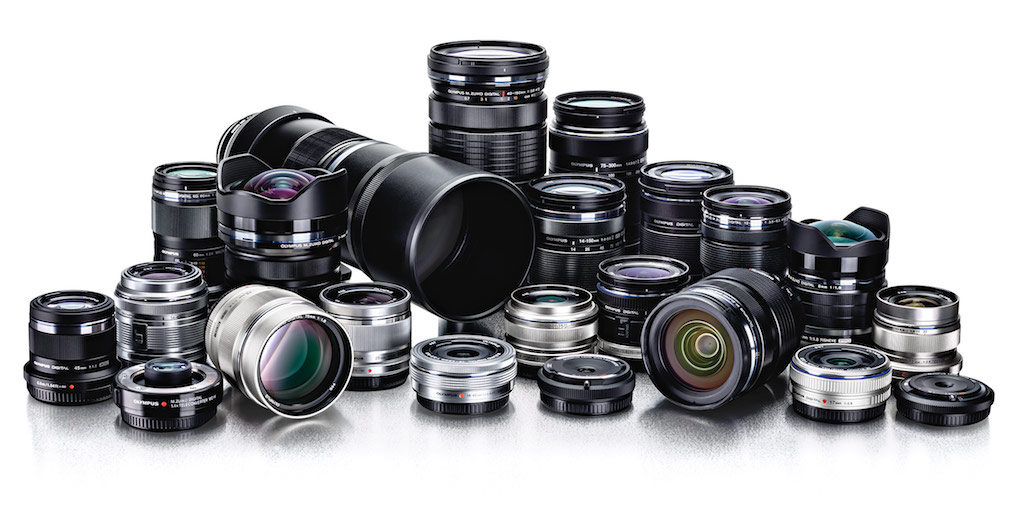
There is one teleconverter available from Olympus that works with the 40-150mm Pro and the 300mm Pro. You can also adapt 4/3 DSLR lenses with the MMF-3 accessory and retain full autofocus control. Some adapters such as the Metabones Speed Booster Ultra or Smart T adapters will give you autofocus with Canon EF lenses too.
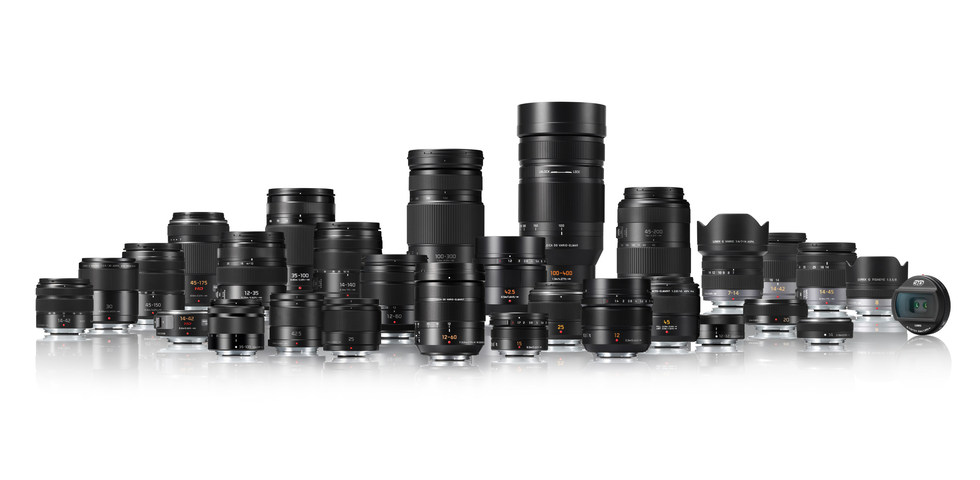
The Fuji X system is growing fast and today you can find more than 20 lenses made by Fujifilm plus two teleconverters that are compatible with two lenses (XF 50-140mm and XF 100-400mm). You can find three lenses from Zeiss with a native X-mount and autofocus. There is less choice when it comes to affordable prime lenses but the system is growing fast and you can find now a set of well-priced f/2 primes.
Some third-party manufacturers such as Samyang also make manual focus lenses available for both mounts.
A similar reasoning can be applied to some accessories where you may find more choice for Micro Four Thirds than for Fujifilm (underwater housing for example) but it doesn’t apply to every category.
Finally, a word about firmware updates. Fujifilm is one of the best examples of a company that keeps its cameras alive through the years with new features and improvements. Olympus can be considered as good as Fujifilm at least when it comes to its advanced cameras.
Price
Before the conclusion, it is worth reserving a paragraph for the price because it is a relevant difference that favours the X-T2.
The Fuji camera was launched with a price of around $1600, but today you can find it for half the price thanks to instant rebates and special offers. This is also because the camera has a successor, the X-T3.
The E-M1 II can be found around $1500, which is $500 less than its initial retail price. Of course cash-backs and special deals can bring the price further down.
Conclusion
In my humble opinion, the Olympus OM-D E-M1 mark II and the Fujifilm X-T2 were the two best mirrorless cameras of 2016. They are great examples of how far mirrorless systems have come in such a short period of time. Undeniably, there are areas where the two cameras closely resemble each another, but there are an equal number of differences that set them apart. These can be attributed not only to the brands’ individual know-how but also to their distinctive philosophies.
It is the dichotomy of simplicity versus sophistication, tradition versus speed. It is less versus more. But whomever you consider to be the winner, it is important to remember that the race is closer than ever before.
In terms of image quality, many will assume that a larger sensor is better, but the E-M1 II proves that Micro Four Thirds can hold its own even in the company of the best APS-C sensors on the market. While high ISO performance remains an advantage for the APS-C X-Trans sensor, particularly past 3200, the Olympus camera doesn’t pull any punches when it comes to dynamic range.

The straightforward control layout of the the X-T2 will appeal to many photographers of both old and new generations, as will the mix of modern technology and tradition. The E-M1 II is more complex but has a better grip and more options. For some it might be too overwhelming while others will praise the high level of customisation the camera has to offer.
The Olympus has a plethora of extra features: some are secondary while others can make a real difference. The continuous shooting speeds and buffer capabilities are second to none, and the updated image stabilisation is definitely a killer point, especially when combined with Sync IS lenses.
The X-T2 may have fewer advanced features but it delivers when it comes to image quality and autofocus. Concerning the latter in particular, I admit I find it better than the E-M1 II. The AF-C Custom settings require some getting used to, but once you set them correctly, your hit rate can skyrocket.
The E-M1 II is also very capable but I put it in second place because the performance can lack some consistency in comparison to the Fuji. The difference isn’t enormous however and in capable hands, they can both perform well.

The two cameras also represent Olympus and Fujifilm’s first serious attempt at video: they can record 4K and have sufficient settings to satisfy enthusiasts and even videographers who want simple cameras that deliver. The conclusion I came to for stills is the same for video in terms of image quality. Again, the E-M1 II can take advantage of its in-body image stabilisation, which also works wonders for video, while continuous autofocus is the X-T2’s strong point, especially for fast-moving subjects.
The choice between the two cameras also needs to be extended to the entire system, not just the single body: today Micro Four Thirds not only has a broader selection of lenses and accessories but remains perhaps the only system with reasonably compact dimensions. This applies even to the professional lenses. While it is true that the X-T2 body itself isn’t bigger or heavier than the E-M1 II and that small XF lenses do exist, all you have to do is mount an XF 100-400mm and the “size and weight” advantage diminishes. Of course, this is not intended as a criticism but rather a footnote worth including.
There is nothing more I can add, if not the list below that summarises the most important points. Now it’s your turn: let us know which one you like the most in the comments below!
Choose the Olympus OM-D E-M1 II if:
- You like the idea of personalising the controls as much as possible
- You are a wildlife or sports photographer who wants to work with a more compact system
- You can take advantage of the impressive speed, larger buffer and features like Pro Capture or High Res Shot
- You want the best image stabilisation for stills and video so you can almost always leave your tripod at home
- You want a better selection of lenses, whether they be advanced pro lenses or cheap fast primes
- you want superior battery life
Choose the Fujifilm X-T2 if:
- you feel that the manual, old-fashioned controls will enhance the user experience
- you want one of the best EVFs on the market
- you prefer a more straight-forward camera without too many extra bells and whistles you won’t bother with anyway
- you want better continuous autofocus performance (stills and especially video)
- you want better high ISO performance, especially past 3200
- you can live without a touch screen!
Check the price of the Fujifilm X-T2 on
Amazon | Amazon UK | B&H Photo | eBay
Check price of the Olympus OM-D E-M1 II on
Amazon | Amazon UK | eBay | B&H Photo
Second-hand Olympus cameras on
Second-hand Fujifilm cameras on
You may also be interested in:
- Sony a6500 vs Fujifilm X-T2 – The Complete Comparison
- Fujifilm X-T2 vs X-T3 – The complete comparison
- Panasonic G9 vs Olympus OM-D E-M1 II – The complete comparison
- Electronic shutter evolution – Sony A9 and Olympus OM-D E-M1 II
Sample images
E-M1 II


X-T2