
So, you've built this awesome project using ESP8266 hardware that has a LiPo battery attachment, like the SparkFun ESP8266 Thing or Adafruit Feather Huzzah. Or, you just connected your NodeMCU to a USB battery pack. But, after running, you realize that the battery doesn't last very long.
Since a lot of the time we are not in control of the hardware/components in the microcontroller, we can't optimize the hardware. But, we can write firmware to sleep the hardware to save power. While sleeping, the device draws much less power than while awake.
In this article, we are going to focus on sleeping with the ESP8266.
Types of Sleep
There are four types of sleep modes for the ESP8266: No-sleep, Modem-sleep, Light-sleep, and Deep-sleep.
They all have different functions.

No-Sleep
The No-Sleep setting will keep everything on at all times. Obviously, this is the most inefficient and will drain the most current.
Modem-Sleep
Modem-sleep is the default mode for the ESP8266. However, it's only enabled when you're connected to an access point.
While in Modem-sleep, the ESP8266 will disable the modem (WiFi) as much as possible. It turns off the modem between DTIM Beacon intervals. This interval is set by your router.
Light-Sleep
Light-sleep performs the same function as Modem-sleep, but also turns off the system clock and suspends the CPU. The CPU isn't off; it's just idling.
Deep-Sleep
Everything is off but the Real Time Clock (RTC), which is how the computer keeps time. Since everything is off, this is the most power efficient option.
If you need more details, be sure to check out the documentation.
 Deep-Sleep
Modem-sleep and Light-sleep are helpful if you still need to have your ESP8266 functioning and you want some additional power options. They're also easily configurable in the ESP8266 WiFi settings. But, if you need some serious power control, Deep-sleep is the way to go.
With Deep-sleep, our application structure can follow these steps:
- Perform some action (read from a sensor)
- Sleep for
nmicroseconds - Repeat
It's important to note that the sleep time is specified in microseconds (µs).
Fun fact, you can't sleep forever. According to the ESP8266 SDK, you can only sleep for 4,294,967,295 µs, which is about ~71 minutes.
Now, let's dive into some code. In these examples, I'm going to be using the Arduino IDE.
Basic Deep Sleep
Let's take a look at a simple example:
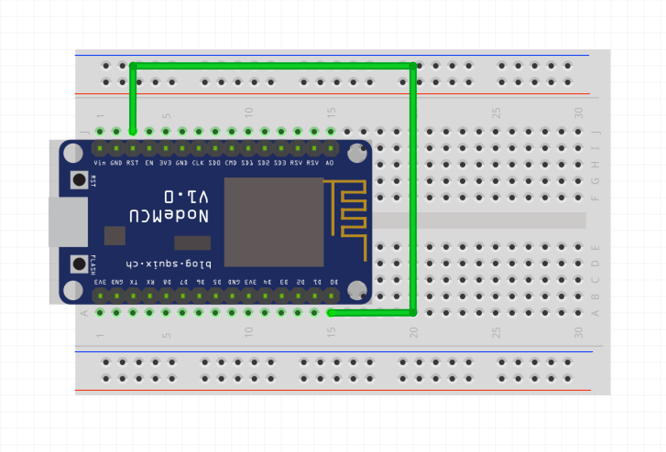
Even though we aren't connecting anything, to enable Deep-sleep, we need to tie the RST pin to GPIO 16 on the ESP8266. On the NodeMCU, GPIO 16 is represented as D0.
If we take a look at the pinout for the NodeMCU, we can see that GPIO 16 is a special pin:
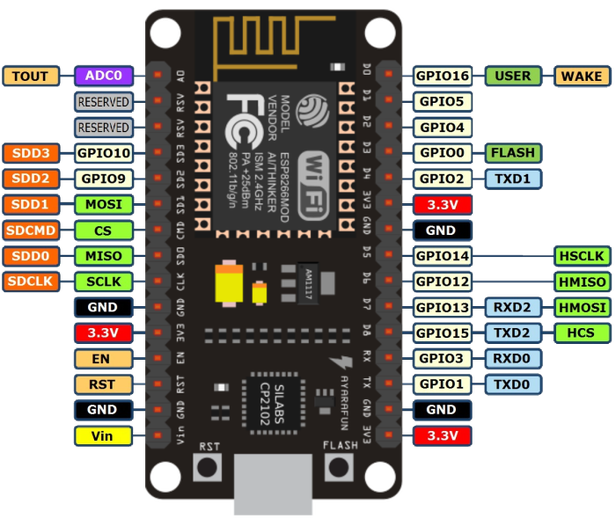 The
The RST pin is held at a HIGH signal while the ESP8266 is running. However, when the RST pin receives a LOW signal, it restarts the microcontroller. Once your device is in Deep-sleep, it will send a LOW signal to GPIO 16 when the sleep timer is up. You need to connect GPIO 16 to RST to wake up ( or reset ) the device when Deep-sleep is over.
Here is the code:
In this example, we log to serial, go to sleep for 20 seconds, and repeat. You can use this example as a boilerplate for other programs.
Deep Sleep With Connection
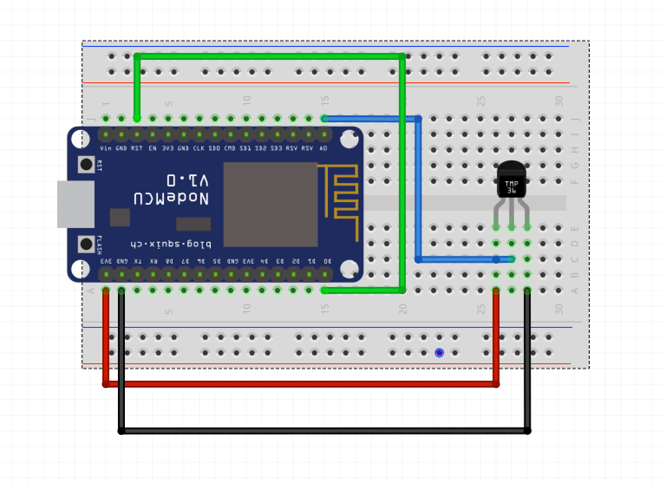
In the real world, we'll want to perform an action, like make a network request, while the device is awake. Let's go through an example of sending a temperature sensor reading to Losant every 20 seconds and sleep in between.
Here is the code:
In this example, we follow the following steps:
- Connect to Wifi ( if not connected )
- Read Temperature sensor from Analog
- Go to sleep for 1min
- Repeat
The End
Now that you know how to sleep, you can make your hardware more power efficient. 🔋
If you have any feedback or comments, please let us know in the comments or on Twitter.