Table of Contents [hide]
Among the things I love the most in Visual Studio 2015 is the seamless integrations of some of the most advanced community-driven, modern development tools such as Node.js, NPM and Bower. Conversely, among the things I love the least there is the fact that, sadly, the designers chose to ship the product with it's own version of Node.js and NPM providing them in a internal bundle package instead of installing and using them as external executables. This can be a minor nuisance or a major problem, depending how much you're using these tools and how often you need to keep them up-to-date - which is something that VS2015 doesn't allow you to do from within the GUI.
Luckily enough, we can easily update them both with a bit of manual work: let's see how.
Update NPM only
If we only need to update NPM, we can do it in a matter of seconds.
- Open a Command Prompt with administrative rights.
- Navigate to the C:\Program Files (x86)\Microsoft Visual Studio 14.0\Web\External\ folder, which is where Visual Studio 2015 keeps the third-party bundles.
- Once there, execute the following command to see the NPM currently installed version: npm -v
- Right after that, execute the following command to update NPM to the latest available version: npm install npm -g (or npm install npm@latest -g if the former doesn't work, as explained here).
That's it.
Update NodeJS and NPM
Unfortunately, we can't do the same with Node.js because the update via NPM - although supported by all the linux distributions - doesn't work for the Windows port. If we want to update it too, we need to install the latest version manually using the appropriate .msi package and then instruct Visual Studio 2015 to use it instead of the bundled one.
Installing Node.js
- Download the Node.js latest version from the official project page (currently it's 6.3.1).
- Install it and take a note of the installation path, such as C:\Program Files\nodejs (the default one).
- Once done, open a Command Prompt with administrative priviledges, navigate to the installation folder and update NPM to the latest version by typing npm install npm -g .
Telling VS2015 to use the new version
- Launch Visual Studio 2015.
- From the main menu, go to Tools > Options > Projects & Solutions > External Web Tools.
- Click to the "Add new" icon on the top-right of the screen and add the Node.js installation path, then use the arrow icons to move it to the top of the list.
If you do it correctly you should end with a result similar to the following screenshot:
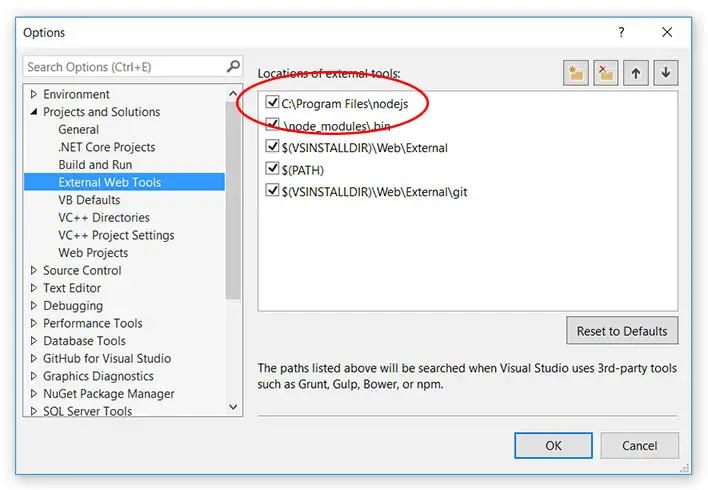
From now on, Visual Studio 2015 will use the updated versions of Node.js and NPM instead of the bundled ones.
Common issues
If you're unable to update NPM due to some console errors such as the following one:
npm ERR! enoent ENOENT: no such file or directory
you could try these workarounds:
- Try to clean the NPM cache using npm cache clean and try again.
- Specify the desired version (latest) using the npm install npm@latest -g revised command (thanks to Mark Olbert for sharing this).
That's it for now: happy coding!

Updating npm after installing nodejs failed on a Windows 10 64 bit system. The most relevant error message seems to be “npm ERR! enoent ENOENT: no such file or directory, open ‘C:UsersMarkAppDataLocalTempnpm-25052-7506ba8cunpack-2b7b8f6fpackage.json'”
Hello, I suggest to try these 2 workarounds (one after another):
==Workaround 1==
Run a Command Prompt (with admin rights), navigate through the /nodejs/ installation folder, then execute the following:
npm cache clean
==Workaround 2==
– delete the /node_modules/ folder inside /nodejs/ installation folder.
– delete the C:AppDataRoamingnpm-cache folder
– uncheck and re-apply Read-only flags in the C:AppDataRoamingnpm folder properties
Always remember to open each and every Command Prompt (including the one you’re using to update nodejs/npm) with administrative rights.
Please let me know if you’ve been able to solve this using #1 or #2, so I’ll update the post accordingly.
Sorry, but I think I found another way (see my second post)
NP, I updated the post and also mentioned you for your kindness. Take care!
You’re quite welcome. You did all the heavy lifting!
Some additional searching turned up this issue, which solved my problem and let me update npm:
https://github.com/npm/npm/issues/7584
The reivsed command is:
npm install npm@latest -g
Nice to hear that, I’ll update my post accordingly. Thanks for sharing this.
Thanks