In my very slow and not very steady quest to learn the Rust programming language, I’ve come across a few projects written in the language that I use everyday. I thought I’d write a quick post about them, with some configuration tricks that I’ve made to make them suit my needs.
Why prefer tools built with Rust? Rust programs are fast. Rust’s design as a language and compiler ensures safety from a group of bugs and pitfalls. It’s also the four-time-running most loved programming language, according to a yearly Stack Overflow survey. Also, since Rust is only a few years old, any program written in Rust is by definition new. Of course newer doesn’t always mean better, but as a non-professional developer I can afford to be on the edge a bit.
Do you know of other tools written in Rust that you’ve found useful? Leave a comment!
Update from 2022: I now maintain a separate curated list of command-line utilities written in Rust.
Terminal Emulator
First up, Alacritty: a cross-platform, GPU-accelerated terminal emulator written in Rust.

Alacritty’s developers claim it’s “the fastest terminal emulator in existence,” and that they’ve performed benchmarks to prove it. It’s certainly snappy enough for me – I remember the first times I ran the ls command and being impressed by how the output seemed to rush to the screen, like it was overexcited to be there. It seems faster than iTerm2, for example.
Note that Alacritty is in a self-described “beta” stage, and may not be as feature-rich as other terminal emulators – for example it does not currently have tabs or split windows (you have to run multiple instances of Alacritty, or run a multiplexer like tmux), though it does now support scrollback. In the ReadMe FAQ section, the developers explain:
Alacritty has many great features, but not every feature from every other terminal. This could be for a number of reasons, but sometimes it’s just not a good fit for Alacritty. This means you won’t find things like tabs or splits (which are best left to a window manager or terminal multiplexer) nor niceties like a GUI config editor.
I was able to replace iTerm2 with Alacritty fully on my work Mac, so if you don’t love having to update your terminal emulator all the time, and can do without tabs or splits, give it a shot!
Alacritty installation options
On MacOS, I build Alacritty from source. You can find their official instructions on how to build from source on GitHub. But if you’re on a Mac and have Rust already installed, I’m pretty sure all you have to do is clone down the repo, run make app, then move the binary to your Applications directory: cp -r target/release/osx/Alacritty.app /Applications/.
Alternatively, you can install via Homebrew with brew cask install alacritty.
Configuring Alacritty
Alacritty looks for a YAML config file in a number of locations. On Mac, I made mine at ~/.config/alacritty/alacritty.yml. There’s a copy of the default config file in the root of the GitHub repo which you can copy down and tweak as needed. Here’s a copy of my config file, which, among other tweaks, has some colors specified to match my Vim colorscheme of choice and is set to use the fontface Hack.
I’d also recommend adding a key binding to open a new instance of Alacritty, and map it to Command + n. To do this, paste the following in the key_bindings section of the config file:
- { key: N, mods: Command, action: SpawnNewInstance }
Lastly, I wanted Alacritty to open to a specific directory when launched, in this case ~/Documents/code. After asking some questions on a semi-related GitHub issue, I figured out how to do this. I added the following snippet to the config file:
shell:
program: /bin/bash
args:
  - -c
- cd ~/Documents/code && exec bash
I can’t say I fully understand it, but it works consistently.
I’ll also note here that there are a ton of ways to re-configure keybindings. See the explanation and defaults at the bottom of the sample config file in teh root of the GitHub repo.
Command Line Tools Written in Rust
For a number of reasons that I’m not quite smart enough to outline here, Rust seems pretty well suited for building command line tools. There are many I don’t mention in this post! In fact there’s a Rust working group just for CLIs (they’re on Twitter and Mastodon). Separately, here’s a casual list of tools from a Mastodon user).
Below I outline a few that I actually use.
exa: “A modern version of ls”
exa is “a modern version of ls” (here’s the official website).
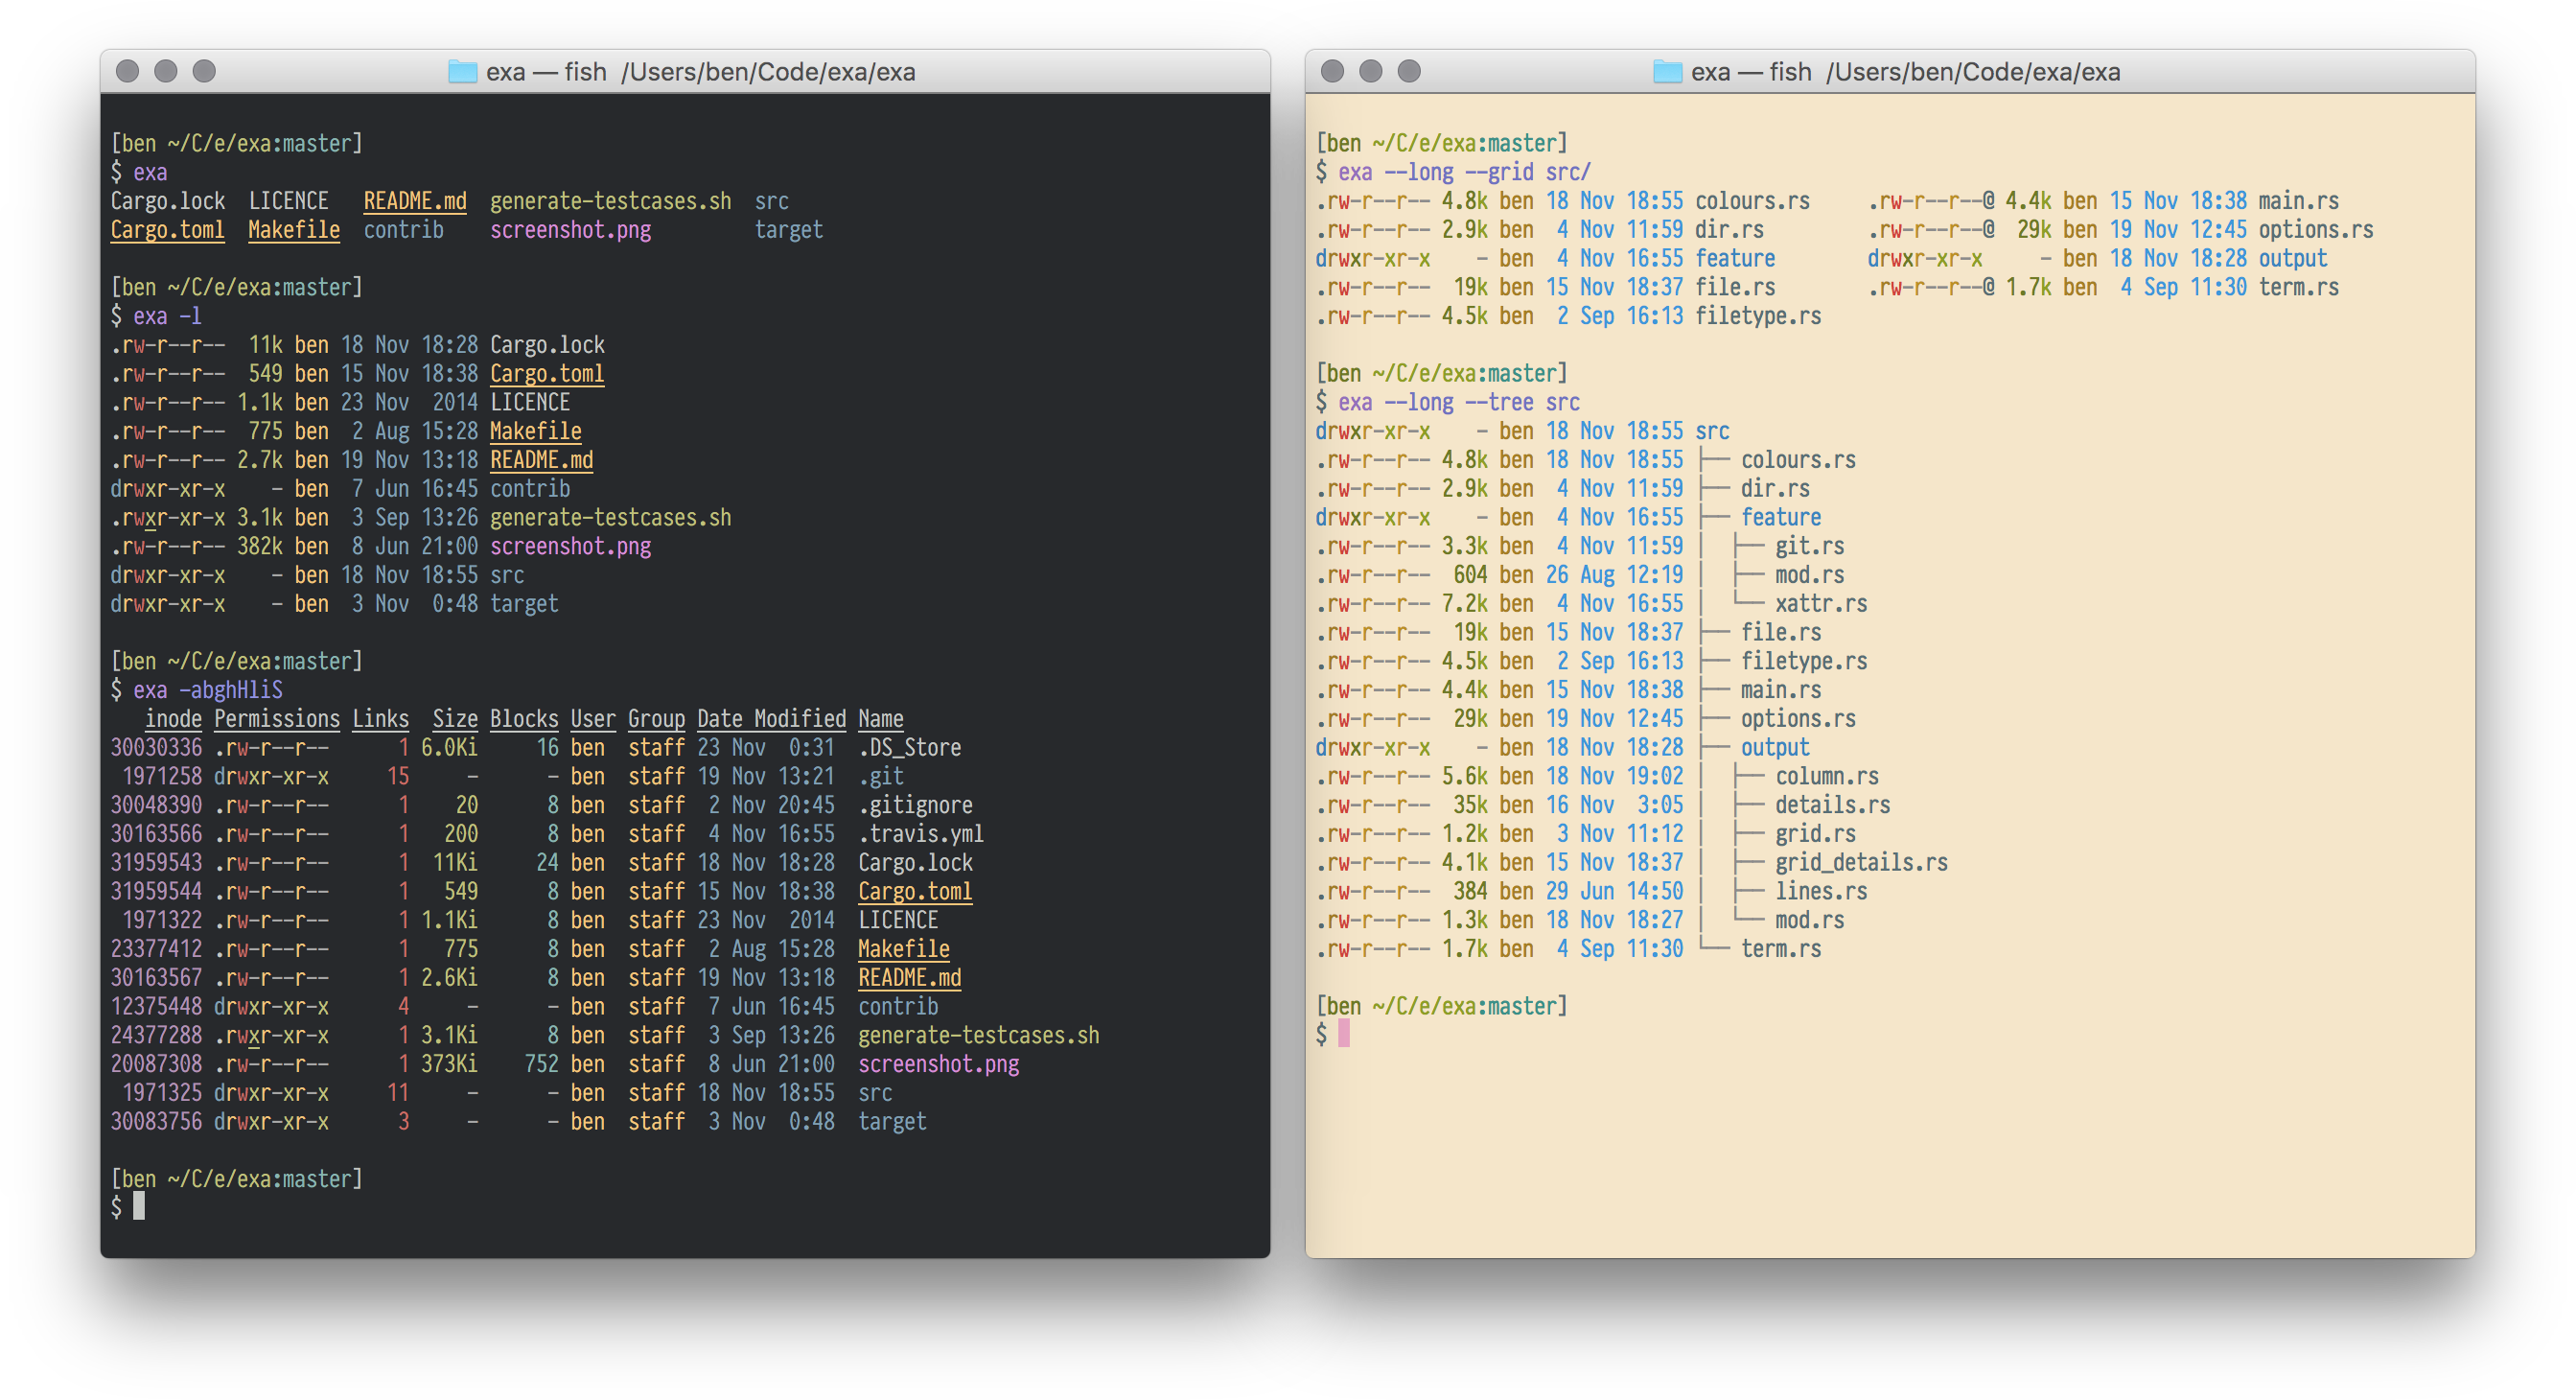
The developers summarize:
exa is a modern replacement for the command-line program ls that ships with Unix and Linux operating systems, with more features and better defaults. It uses colours to distinguish file types and metadata. It knows about symlinks, extended attributes, and Git. And it’s small, fast, and just one single binary.
I’m not sure if it’s faster than ls, but it seems to handle colors well right out of the box, and I list the options it gives (see below).
Installing exa
Again we can either build from source or, on MacOS, use Homebrew. There’s an installation section in the ReadMe.
With Homebrew, you can run brew install exa. If you don’t have the dependency libgit2, try brew install exa --without-git. Without this feature, exa won’t be able to the git status of individual files (not a huge deal, imo).
To build from source, install Rust and then run cargo install exa or, if you don’t have libgit2, try cargo install --no-default-features exa.
Usage
You can just use exa where you would use ls. Then there are tons of options explained in the ReadMe. I particularly like the --long, --tree and --all options.
Helpful bash aliases to use with exa
I decided to map ls to exa. In other words, when I call ls, exa actually runs. I accomplish this through a number of aliases listed below.
Below are a few aliases I put in my ~/.bash_profile (or ~/.bashrc) that, if the exa command is installed, calls exa when I run ls, plus adds some other handy options:
if type exa 2>/dev/null; then
  alias ls='exa'
  alias l='exa -l --all --group-directories-first --git'
  alias ll='exa -l --all --all --group-directories-first --git'
  alias lt='exa -T --git-ignore --level=2 --group-directories-first'
  alias llt='exa -lT --git-ignore --level=2 --group-directories-first'
  alias lT='exa -T --git-ignore --level=4 --group-directories-first'
else
  alias l='ls -lah'
  alias ll='ls -alF'
  alias la='ls -A'
fi
Bat
Bat is a replacement to cat that provides syntax highlighting and other features. It’s a quick way to print the contents of text files to the terminal.
There are a number of installation methods listed in the project’s README.
Dust
Dust is “a more intuitive version of du in Rust”. If you’re unfamiliar with du, Dust devs explain: “Dust is meant to give you an instant overview of which directories are using disk space without requiring sort or head.”
(du --help explains it’s aim is to “Summarize disk usage of the set of FILEs, recursively for directories.”)
So basically Dust is helpful when you want to see what directories and files are taking up a lot of space on a hard drive. I’ve never used du before, but trying it now by just running du, it spits out a list of every file in a directory, recursively, with its size. I’m sure there are a series of flags I could run with it to get the output similar to dust’s default output… or I could just use dust.
du does seem to be faster than dust though, so we’re not gaining speed here. (As a third alternative, a Mastodon friend pointed to ncdu).
Installation
cargo install du-dust or download the appropriate binary from the Releases page.
Usage
Run dust in a directory that you want to map out. Here’s an example from the ReadMe:
$ dust
1.2G  target
622M ├─┬ debug
445M │ ├── deps
 70M │ ├── incremental
 56M │ └── build
262M ├─┬ rls
262M │ └─┬ debug
203M │   ├── deps
 56M │   └── build
165M ├─┬ package
165M │ └─┬ du-dust-0.2.4
165M │   └─┬ target
165M │     └─┬ debug
131M │       └── deps
165M └─┬ release
124M   └── deps
ripgrep
ripgrep is, as you may have guessed, a faster replacement for GNU’s grep command.
ripgrep is a line-oriented search tool that recursively searches your current directory for a regex pattern. By default, ripgrep will respect your .gitignore and automatically skip hidden files/directories and binary files. ripgrep has first class support on Windows, macOS and Linux, with binary downloads available for every release. ripgrep is similar to other popular search tools like The Silver Searcher, ack and grep.
I’m the first to admit that my regex skills are lacking, but if you’re a frequent grep user, ripgrep might be a speedier substitute. You can also use ripgrep with fzf and Vim apparently.
Installation
As the ReadMe explains, there are precompiled binaries for all platforms. Or you can use Homebrew: brew install ripgrep.
Ion: A shell written in Rust
Ion “is a modern system shell that features a simple, yet powerful, syntax. It is written entirely in Rust, which greatly increases the overall quality and security of the shell.” It is “developed alongside, and primarily for, RedoxOS,” an operating system written in Rust. But Ion promises to be fully capable on other *nix platforms.
I haven’t tried Ion myself, but readers of this post might be interested!
Other Rust Programs I’m Hoping to Try at Some Point
-
Zola is a static site generator written in Rust. Currently I’m using Jekyll, which is written in Ruby and is generally kind of a pain to set up and maintain. I’m hoping Zola is faster and, assuming it uses Cargo, will be easier to install/upgrade/maintain.
-
miniserve is “a CLI tool to serve files and dirs over HTTP”. To do this, I usually go for
python -m SimpleHTTPServer 8000, but I’m betting miniserve has a bunch more capabilities out of the box. A commenter pointed me to another option for this, also written in Rust, called simple-http-server. I haven’t tried either of them yet. -
Amp, remacs, and iota are all terminal text editors written in Rust. (Though I am really locked into Vim at this point…)
And, as mentioned above, there are a number of command line tools written in Rust not mentioned here. In fact there’s a Rust working group just for CLIs (they’re on Twitter and Mastodon). Separately, here’s a casual list of tools from a Mastodon user).
If you know of other cool tools written in Rust, let me know in the comments, on Mastodon, or on Twitter.